

Many people do not dare to experiment with light or use their flash and feel flash is bad and run away from it. While few others try to learn how to use their flash but find it difficult or get lost in the pool of information that they find them self with.
May a times people have asked me were they can learn about lighting and I have a standard answer i.e, I refer them to David Hobby’s blog at Strobist and tell them its one stop place to lighting nirvana.
So why am I writing this? Good question.., the thing is that if you remember your first day at college.. one can easily get lost in the vast campus.. something similar happened to me at ‘University of Light’ run by our dear professor David. And I have the feeling that I am not alone here since may of my friends also said the same that they had got lost in the pool of information that’s available at Strobist. Though the site has lot of information it is organized differently and it takes time to get the hang of it.
So here I would like to help you my fellow photographer in your pursuit of light by providing you with a quick start guide to Strobisim. So what this will do is tell in a very basic form what Strobism is and what are its principals and what it can do for you and your photography. So once you get a taste of this you have to go to our Strobist for more of this and I bet you will be around there for a very long time to come.
Below you can see few of my photographs that use technique that I have learnt at Strobist; this should give you some idea.

So who is this for?
This article is for any one who has a decent camera that would allow manual mode (can control aperture and shutter independently) and would like to learn about lighting to improve his photography. Your camera should also have a hotshoe or ‘pc*1 sync function’ to allow use of external flash. I will assume that you have basic understanding of a camera operation and know what a aperture or shutter is. If you like to brush up your skills do go through this excellent tutorial by Jodie Coston @ morguefile.com. Here we would be learning basis of light and how to control it and this is not for people looking for everything auto .. stuff like ttl .. so if you are looking for it then you are better off searching in google.
More after the jump…
So what you need?
A decent camera which has a manual mode (can control aperture and shutter independently). Your camera should also have a hot-shoe or ‘pc sync function’ to allow use of external flash. You would also need at least one flash; don’t worry if you don’t have it right now you can get one on the way. For this you won’t need to break your bank account and you can use any of the cheap manual flash out there. We will come to a recommendation soon.
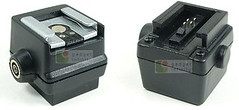 PC sync is used mainly by PWs (Pocket Wizards) to communicate; this is not much of a problem, one can get ‘Hot Shoe to PC Sync Adapter for External Strobes’ (these are very cheap) at most online store like gadgetinfinity.com or you can buy it locally at Jayesh or RK in Bangalore.
Let me share my full setup; I use ‘Canon 350D’ body and have one flash (also known as speedlite/strobe) - ‘Vivitar 285HV’.
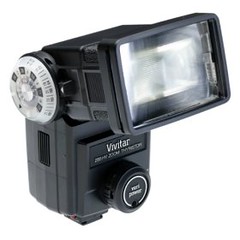 Vivitar 285HV (aka 285HV) is a manual (non ttl) flash; its cheap ~ INR 3500 (~90USD) provides full control (power settings from full power to 1/16 power). Vivitar 285HV is just a example and you can use any flash that provides basic control of power and provides Hot Shoe or pc-sink connection option.
Always remember Strobist principal #1 “Less Gear”. So we don’t need expensive ttl flash (if you want you can use them.. but all one needs is a manual flash with variable power (optional) with a Hot Shoe or pc jack. If you have more or higher end ttls) flashes it provides you flexibility thats all.
Let get started ?
First we need to move the light source away from the camera axis. For this we use triggers; these basically connect at one end to camera and other end will connect to flash.
There are many ways.. you can use optical trigger(not flexible; but cheep); connecting cable(I started with these).. works perfect (very cheap).. but not very comfortable outdoor as the wires come in your way (now use them as backup). Next we have wireless trigger(or radio trigger). You get many kinds
(a) ebay/Gadget Infinity trigger(GI) – reasonable price and decent performance. Currently I use them and have around 3 receivers and 1 transmitter. You can buy them here
(b) Radiopopper - This is very new and yet to be released to the market and looks promising and is a middle ground between GI and PWs. more info here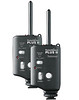
(b) Pocket Wizards – gold standard in wireless trigger and used by professionals .. very reliable but costly ![]() - info
- info
Initially all these looks very complex and intimidating… but soon it will become second nature and you will enjoy every bit of it. And even when you don’t have a flash.. you can use strobisim; having understanding of light and shadow helps one to see a seen differently and appreciate available light.
Where do I place my off camera flash?
Well let me tell you my secret… I normally and whenever possible use what is known as ‘Voice activated light stand’. These are very flexible and come very cheap. This can be models friend, your fellow photographer or your spouse, so make use of whatever is available. ![]()
In other situations; I use my tripod sometimes or I also carry my ‘8ft. Air Cushioned Light Stand’ which was part of my Starving Student PC Kit (SP2); that I bought at mpex.com
The ‘Bongo Elastic Ties’ (come part of the kit) are very helpful to hold your flash on to any available thin object. This kit also comes with ‘Umbrella Swivel’ that I use to hold my umbrellas and flash on the stand.
Metering with a manual flash / off camera flashes.
Note: Most flashes when used as off camera under normal condition with say radio/optical trigger are reduced to manual flashes. This happens since ttl connection is not covered or available in most off camera communication modes. Unless you use some sort of ttl cord to communicate with camera and flash or use other means to get the ttl data to the camera you will need to rely on the manual way of metering described below.
So how do you meter the camera with flash being in play? During a flash photography session there are two distinct planes of light that need to be metered and captured by your camera.
- The natural available lit area of your frame
- The flash light lit area of your frame
Okay; now to keep things simple lets not take iso setting into account and keep this constant for this exercise. But do note that you can extrapolate the same and use iso control to control the overall exposure.
Another important thing to note is something called ‘flash sink speed‘ of your camera. This is typically around 1/200 of a sec to 1/250 of a sec depending on the brand of your camera. So what does this mean? All it means is that this is a max shutter speed you can use with flash without any of the shutter curtain closing before it completely opens. To put this in plain English; if you use shutter speed above this and use your flash one of the sides of your frame will not get the flash and would end up becoming black band under normal conditions. There are few ways to cheat this .. mainly if your camera uses digital shutter. Go through Strobist post for more info; this has been explained very well by David.
Another thing to note is that its easy to work in a manual mode of your camera when working with flash and I highly recommend it. One can work with other moves like tv or av.. but its not easy and you will be struggling changing exposure compensation.
Okay.. now enough of theory.. hope you guys have not slept off.. ![]() lets get to the real thing. As said earlier.. there would be two different planes of lighting areas one needs to meter for during a flash photography session ‘the flash lit area’ and ‘ambient lit area’. Keep this in mind the shutter speed controls your ambient part of the exposure mostly and adjusting the aperture can control the flash lit part of the frame.
lets get to the real thing. As said earlier.. there would be two different planes of lighting areas one needs to meter for during a flash photography session ‘the flash lit area’ and ‘ambient lit area’. Keep this in mind the shutter speed controls your ambient part of the exposure mostly and adjusting the aperture can control the flash lit part of the frame.
You may be wondering why is that? Think about this the flash lasts only for a 200th frication of a second so any small change in shutter speed would not effect amount of light falling on your sensor/film. So the amount of light that is falling on your frame can be controlled using aperture. And since the ambient part of the exposure is continues.. one can control this using shutter speed.

Now lets take an example. In the above shot we have a sunset with a flash lit model in the foreground. So I change my camera mode to manual mode and meter for the setting sun and the blue sky. My Canon350D has a sync speed of 1/200; but I can’t use this with my radio triggers since there is a small delay in communication, so I get small black band if I shoot at 1/200. So I set my shutter to 1/160. Now I adjust my aperture till the exposure is good. One may need to adjust the iso, if the lowest aperture does not provide good enough exposure at the shutter speed you are working.
Now we bring the flash in from camera left and say start with half power and take a test frame. Now check the exposure; if the flash lit area is under exposed we can try two things. Either open up the aperture if your lens allows or increase the flash power to full or move your flash bit closer to the subject. If you decide to increase the flash power then you may need to increase/close down your aperture to compensate for the increase in power. With couple of tries one can arrive at the proper setting to get the desired effect. Always keep in mind there is no perfect exposure here. It all depends on what you are looking to capture, like I have bit under exposed the ambient to get deep blue colour here.
Also the background could have been made lighter by using an even slower shutter speeds, or by cutting the power ratio and opening the aperture a bit instead; this would have provided bit more detail in the background.
Now you guys know; why the 2nd line in strobist tag line is called “more brain”.. i.e because we use our brain to control the look we get for our picture and not some computer chip in the ttl flash.
Here you can view my full set of photos where I used Strobist principals .
Hope I was clear here.. now this is basic information.. and I am not master here.. just telling you people few thing that I have been able to learn from David at Strobist. Do let me know if you guys have any questions or something is not clear. So for all there is to learn on lighting do visit his blog. And lastly would like to thank david for sharing his knowledge with all of us at Strobist.com. And one can get started here and by following with Lighting 101 or Lighting 102
So happy clicking .. hope to see some great stuff from you guys. Please do feel free to correct me if I have put something wrong here or have missed some thing.

Less Gear • More Brain • Better Light
*1: PC connector has nothing to do with PCs, It came from a collaboration between Prontor and Compur to put a common flash sync connector on leaf shutters they made. Thanks to Henry for letting me know about this.
Photographs displayed here are copyright protected (All right reserved) and I own the copyright (except the pictures of gear). You may only use it in its original form for personal use on your computer. The images should not be reproduced, published, transmitted in any forum or in print or in any other physical or electronic forum either in part or in whole without the explicit written consent from the copyright owner. Legal action will be initiated against any individual, organisation, institution, agency, publishing house, etc. who violate the Copyright laws including but not limited to those mentioned here and use the image for any commercial/non-commercial purposes. If you would like to use any of the photograph displayed here commercially or would like to use for any other use please do contact me.
March 16th, 2008 at 6:49 am
Akshath-
Cool, man. Thanks much for the shoutout!
-David
Strobist.com
March 16th, 2008 at 10:03 pm
Very useful information, made much easier to understand for beginners. Thanks!
March 19th, 2008 at 9:00 pm
A quick start guide to off camera lighting…
Help you in your pursuit of light by providing you with a quick start guide to Strobisim. So what this will do is tell in a very basic form what Strobism is and what are its principals and what it can do for you and your photography….
March 22nd, 2008 at 5:57 pm
Quick start guide to off-camera lighting…
Tells you in a very basic form what Strobism is and what are its principals and what it can do for you and your photography. So once you get a taste of this you have to go to our Strobist for more of this and I bet you will be around there for a very l…
May 21st, 2008 at 10:02 pm
[...] by akshath in Photography To take things forward from my post ‘A quick start guide’ some time back… I would be organizing a Strobist MeetUp with some fellow photographers at [...]
May 25th, 2008 at 6:59 am
Akshath,
Nice synopsis of The Strobist method!
June 7th, 2008 at 12:15 am
hey..!
i got here from trying to find strobists in india..! but unfortunately you’re in bangalore and i’m in Delhi,
i still havent taken my first proper strobist shot,but i’m trying to read up as much as i can on it before i start experimenting…
any pointers regarding the high speed sync mode with the SB-800?
June 7th, 2008 at 9:40 am
thanks David, Surendar, Seshu for dropping by.. appreciate the comments.
@shiv: hay.. nice to know that dude.. unfortunately I don’t have any experience working with SB-800s; i guess you may find your answers at Strobist Flickr group…
February 16th, 2009 at 4:41 pm
Hi Akshath,
Thanks for the simple write-up on Strobism. I was going through Strobist.com and needless to say that I was getting mad with the amount of information. I wanted some Bangalore way of explaining it. I got it here.
Need your expert advice on the following query..
I went to Naresh asking for Speedlight, he gave me following options.
1. Vivitar 285HV 3.3K
2. Used Mecablitz 36 CT 3 (Metz) - 4.5K
3. Unomat BC 32 T - 3K
Which one will you suggest for Strobist need..
Also, what would you suggest for triggers? Can I buy Cactus V2 with Jayesh or Naresh or something else is there?
Asking your advice considering your expertise in this area. By the way I have met you in Prem sir’s house.
Regards,
Prashanth
February 18th, 2009 at 10:10 pm
hay Prashanth..thanks for your comments dude…
i would go with Vivitar 285HV any day.. i currently use 2 of them and they are very reliable…
about triggers.. feel Naresh/Jayash..do not have much choice for wireless options.. ur best bet would to order online at gadgetinfinity.com
September 18th, 2009 at 10:30 pm
Very cool and useful writeup dude!
-rAm
October 21st, 2009 at 10:06 am
Hi,
Thanks a lot for the tutorials. I am just starting up and was wondering which one would be a nice a vivitar 285HV or a nikon sb 80DX
Regards,
Avi
December 27th, 2009 at 6:43 pm
Easily, this article is really the most informative on this deserving topic. I agree with your conclusions and am eagerly look forward to your future updates. Just saying thanks will not just be enough, for the extraordinary clarity in your views and writing. I’m signing up to
April 10th, 2010 at 5:30 am
Cheers lots, I have found this info extremely good!
December 12th, 2014 at 5:10 am
Amir Mojiri London…
share a thought.. » Blog Archive » A quick start guide to Strobisim…